教程
使用 React 构建主从应用
本教程通过引导您构建一个具有基本功能的示例应用,向您介绍使用 NativeScript 和 React 的基础知识。
本教程将教会您以下内容:
- 使用 NativeScript 组件构建布局
- 使用手势为您的应用添加交互性
- 使用路由在不同视图之间导航
先决条件
为了充分利用本教程,您应该已经具备 React 的基本了解。如果您完全不了解 React,您可能需要先尝试官方的 React 教程。
示例应用程序概述
您将构建一个主从应用,该应用显示音乐剧列表,并允许您导航到详细信息页面以查看有关每个音乐剧的更多信息。
您可以在 GitHub 上找到应用程序的完整源代码。
设置您的环境
要设置您的开发环境,请按照文档的 环境设置 部分中的说明进行操作。
创建新的 NativeScript 应用程序
在本教程中,我们将使用 TypeScript。要创建一个新的 NativeScript TypeScript 应用程序,请运行 CLI 命令 ns create,后跟应用程序名称和 --react。
ns create example-app --reactNativeScript CLI 创建一个新的目录,根文件夹名为 example-app,其中包含一个初始的骨架应用项目,并安装必要的包和依赖项。这可能需要几分钟时间,安装完成后即可运行。
运行应用程序
转到项目的目录并运行以下命令以在相应的平台上运行它。
cd example-app

// run on iOS
ns run ios

// run on Android
ns run android
ns run 命令构建应用程序并在连接的 Android 设备或 Android 模拟器上启动应用程序(对于 Android),以及在连接的 iOS 设备或 iOS 模拟器上启动应用程序(对于 iOS)。默认情况下,它会侦听代码中的更改,同步这些更改并刷新所有选定的设备。
文件夹结构
基于 TypeScript 入门应用,我们将为我们的应用程序创建以下文件/文件夹结构。
src
  |- assets
      |- anastasia.png
      |- beetlejuicemusical.png
      |- bookofmormon.png
  |- components
      |- HomeScreen.tsx
      |- DetailsScreen.tsx
      |- NavigationParamList.tsx
      |- Navigator.tsx
  |- models
      |- flick.model.ts
  |- services
      |- flick.service.ts
  |- app.css
  |- app.ts
导航设置
让我们从应用程序的导航开始。我们将为应用导航中使用的导航参数定义一个类型。在 components 目录中创建 NavigationParamList.ts 并添加以下内容:
// src/components/NavigationParamList.ts

export type MainStackParamList = {
  Home: {}
}
创建主屏幕
让我们从使用以下内容创建主屏幕文件开始:
// src/components/HomeScreen.tsx

import { RouteProp } from '@react-navigation/core'
import { FrameNavigationProp } from 'react-nativescript-navigation'
import { MainStackParamList } from './NavigationParamList'

type HomeScreenProps = {
  route: RouteProp<MainStackParamList, 'Home'>
  navigation: FrameNavigationProp<MainStackParamList, 'Home'>
}

export function HomeScreen({ navigation }: HomeScreenProps) {
  return <stackLayout></stackLayout>
}
导航容器设置
接下来,设置主导航容器,以便在导航到 Home 时显示主页组件。我们还将在应用程序启动时将 Home 设置为初始路由。我们可以通过将路由名称传递给 Navigator 组件的 initialRouteProperty 来设置默认路由。打开 Navigator.tsx 并添加以下代码:
// src/components/Navigator.tsx

import * as React from 'react'
import { BaseNavigationContainer } from '@react-navigation/core'
import { stackNavigatorFactory } from 'react-nativescript-navigation'
import { MainStackParamList } from './NavigationParamList'
import { HomeScreen } from './HomeScreen'

const StackNavigator = stackNavigatorFactory()

export const mainStackNavigator = () => {
  return (
    <BaseNavigationContainer>
      <StackNavigator.Navigator initialRouteName="Home">
        <StackNavigator.Screen name="Home" component={HomeScreen} />
      </StackNavigator.Navigator>
    </BaseNavigationContainer>
  )
}
主页 UI
在创建主页的 UI 之前,让我们先创建 FlickModel 和 FlickService。这将允许我们直接在模板中使用数据。
FlickModel 将包含每个电影对象的形状。在 src 中创建 models 目录,并在其中创建一个名为 flick.model.ts 的新文件。打开新的 flick.model.ts 并添加以下 interface:
// src/models/flick.model.ts

export interface FlickModel {
  id: number
  genre: string
  title: string
  image: string
  url: string
  description: string
  details: {
    title: string
    body: string
  }[]
}
然后,我们将在 FlickService 中使用 FlickModel 来返回我们的电影数据。在 app 中创建 services 目录,并在其中创建一个名为 flick.service.ts 的新文件。打开新的 flick.service.ts 并添加以下内容:
// src/services/flick.service.ts

import { FlickModel } from '../models'

class _FlickService {
  private flicks: FlickModel[] = [
    {
      id: 1,
      genre: 'Musical',
      title: 'Book of Mormon',
      image: '~/assets/bookofmormon.png',
      url: 'https://nativescript.cn/images/ngconf/book-of-mormon.mov',
      description: `A satirical examination of the beliefs and practices of The Church of Jesus Christ of Latter-day Saints.`,
      details: [
        {
          title: 'Music, Lyrics and Book by',
          body: 'Trey Parker, Robert Lopez, and Matt Stone',
        },
        {
          title: 'First showing on Broadway',
          body: 'March 2011 after nearly seven years of development.',
        },
        {
          title: 'Revenue',
          body: 'Grossed over $500 million, making it one of the most successful musicals of all time.',
        },
        {
          title: 'History',
          body: 'The Book of Mormon was conceived by Trey Parker, Matt Stone and Robert Lopez. Parker and Stone grew up in Colorado, and were familiar with The Church of Jesus Christ of Latter-day Saints and its members. They became friends at the University of Colorado Boulder and collaborated on a musical film, Cannibal! The Musical (1993), their first experience with movie musicals. In 1997, they created the TV series South Park for Comedy Central and in 1999, the musical film South Park: Bigger, Longer & Uncut. The two had first thought of a fictionalized Joseph Smith, religious leader and founder of the Latter Day Saint movement, while working on an aborted Fox series about historical characters. Their 1997 film, Orgazmo, and a 2003 episode of South Park, "All About Mormons", both gave comic treatment to Mormonism. Smith was also included as one of South Park\'s "Super Best Friends", a Justice League parody team of religious figures like Jesus and Buddha.',
        },
        {
          title: 'Development',
          body: `During the summer of 2003, Parker and Stone flew to New York City to discuss the script of their new film, Team America: World Police, with friend and producer Scott Rudin (who also produced South Park: Bigger, Longer & Uncut). Rudin advised the duo to see the musical Avenue Q on Broadway, finding the cast of marionettes in Team America similar to the puppets of Avenue Q. Parker and Stone went to see the production during that summer and the writer-composers of Avenue Q, Lopez and Jeff Marx, noticed them in the audience and introduced themselves. Lopez revealed that South Park: Bigger, Longer & Uncut was highly influential in the creation of Avenue Q. The quartet went for drinks afterwards, and soon found that each camp wanted to write something involving Joseph Smith. The four began working out details nearly immediately, with the idea to create a modern story formulated early on. For research purposes, the quartet took a road trip to Salt Lake City where they "interviewed a bunch of missionaries—or ex-missionaries." They had to work around Parker and Stone\'s South Park schedule. In 2006, Parker and Stone flew to London where they spent three weeks with Lopez, who was working on the West End production of Avenue Q. There, the three wrote "four or five songs" and came up with the basic idea of the story. After an argument between Parker and Marx, who felt he was not getting enough creative control, Marx was separated from the project.[10] For the next few years, the remaining trio met frequently to develop what they initially called The Book of Mormon: The Musical of the Church of Jesus Christ of Latter-day Saints. "There was a lot of hopping back and forth between L.A. and New York," Parker recalled.`,
        },
      ],
    },
    {
      id: 2,
      genre: 'Musical',
      title: 'Beetlejuice',
      image: '~/assets/beetlejuicemusical.png',
      url: 'https://nativescript.cn/images/ngconf/beetlejuice.mov',
      description: `A deceased couple looks for help from a devious bio-exorcist to handle their haunted house.`,
      details: [
        {
          title: 'Music and Lyrics',
          body: 'Eddie Perfect',
        },
        {
          title: 'Book by',
          body: 'Scott Brown and Anthony King',
        },
        {
          title: 'Based on',
          body: 'A 1988 film of the same name.',
        },
        {
          title: 'First showing on Broadway',
          body: 'April 25, 2019',
        },
        {
          title: 'Background',
          body: `In 2016, a musical adaptation of the 1988 film Beetlejuice (directed by Tim Burton and starring Geena Davis as Barbara Maitland, Alec Baldwin as Adam Maitland, Winona Ryder as Lydia Deetz and Michael Keaton as Betelgeuse) was reported to be in the works, directed by Alex Timbers and produced by Warner Bros., following a reading with Christopher Fitzgerald in the title role. In March 2017, it was reported that Australian musical comedian Eddie Perfect would be writing the music and lyrics and Scott Brown and Anthony King would be writing the book of the musical, and that another reading would take place in May, featuring Kris Kukul as musical director. The musical has had three readings and two laboratory workshops with Alex Brightman in the title role, Sophia Anne Caruso as Lydia Deetz, Kerry Butler and Rob McClure as Barbara and Adam Maitland.`,
        },
      ],
    },
    {
      id: 3,
      genre: 'Musical',
      title: 'Anastasia',
      image: '~/assets/anastasia.png',
      url: 'https://nativescript.cn/images/ngconf/anastasia.mov',
      description: `The legend of Grand Duchess Anastasia Nikolaevna of Russia.`,
      details: [
        { title: 'Music and Lyrics', body: 'Lynn Ahrens and Stephen Flaherty' },
        {
          title: 'Book by',
          body: 'Terrence McNally',
        },
        {
          title: 'Based on',
          body: 'A 1997 film of the same name.',
        },
        {
          title: 'Background',
          body: `A reading was held in 2012, featuring Kelli Barret as Anya (Anastasia), Aaron Tveit as Dmitry, Patrick Page as Vladimir, and Angela Lansbury as the Empress Maria. A workshop was held on June 12, 2015, in New York City, and included Elena Shaddow as Anya, Ramin Karimloo as Gleb Vaganov, a new role, and Douglas Sills as Vlad.
        The original stage production of Anastasia premiered at the Hartford Stage in Hartford, Connecticut on May 13, 2016 (previews). The show was directed by Darko Tresnjak and choreography by Peggy Hickey, with Christy Altomare and Derek Klena starring as Anya and Dmitry, respectively.
        Director Tresnjak explained: "We've kept, I think, six songs from the movie, but there are 16 new numbers. We've kept the best parts of the animated movie, but it really is a new musical." The musical also adds characters not in the film. Additionally, Act 1 is set in Russia and Act 2 in Paris, "which was everything modern Soviet Russia was not: free, expressive, creative, no barriers," according to McNally.
        The musical also omits the supernatural elements from the original film, including the character of Rasputin and his musical number "In the Dark of the Night", (although that song’s melody is repurposed in the new number "Stay, I Pray You"), and introduces instead a new villain called Gleb, a general for the Bolsheviks who receives orders to kill Anya.`,
        },
      ],
    },
  ]

  getFlicks(): FlickModel[] {
    return this.flicks
  }

  getFlickById(id: number): FlickModel | undefined {
    return this.flicks.find((flick) => flick.id === id) || undefined
  }
}

export const FlickService = new _FlickService()
在您的项目中添加一个 /src/assets/ 目录,并将示例项目 此处 的 3 个静态图像复制过来。
接下来,让我们分解主页的布局和 UI 元素。
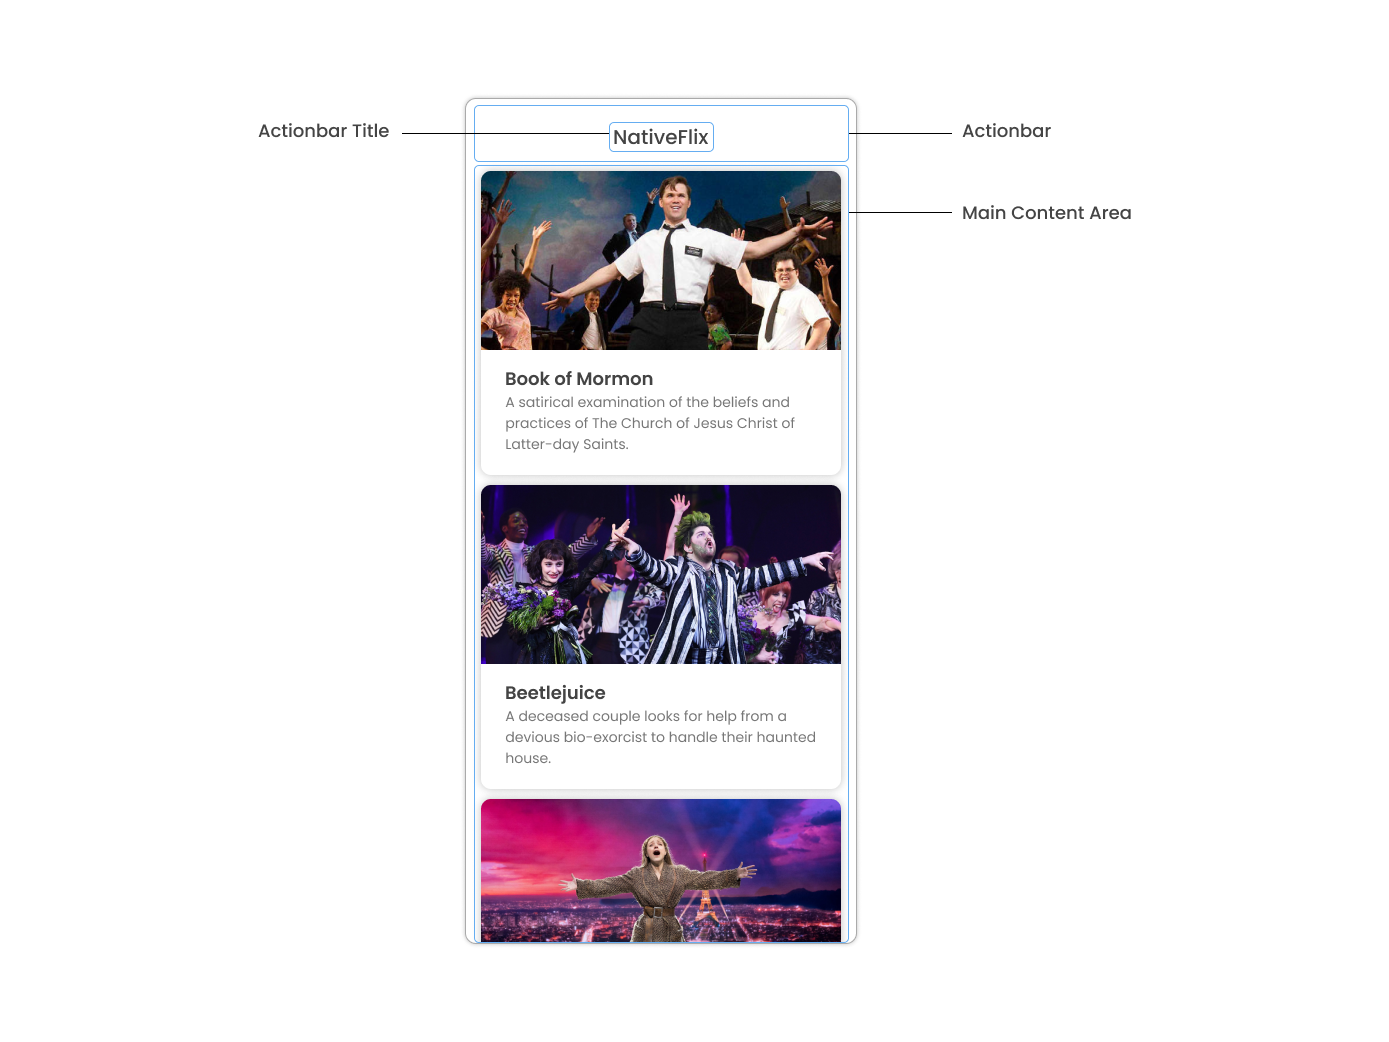
主页可以分为两个主要部分,带有标题的 ActionBar 和带有卡片的可滚动主要内容区域(我们将在下一节中讨论卡片)。让我们从创建带有标题的 ActionBar 开始。打开 Navigator.tsx 并添加以下代码:
// src/components/Navigator.tsx

import * as React from 'react'
import { BaseNavigationContainer } from '@react-navigation/core'
import { stackNavigatorFactory } from 'react-nativescript-navigation'
import { MainStackParamList } from './NavigationParamList'
import { HomeScreen } from './HomeScreen'

const StackNavigator = stackNavigatorFactory()

export const mainStackNavigator = () => {
  return (
    <BaseNavigationContainer>
      <StackNavigator.Navigator
        initialRouteName="Home"
        // Add this 👇
        screenOptions={{
          headerShown: true
        }}
      >
        <StackNavigator.Screen
          name="Home"
          // Add this 👇
          options={{
            title: 'NativeFlix'
          }}
          component={HomeScreen}
        />
      </StackNavigator.Navigator>
    </BaseNavigationContainer>
  )
}
由于我们有一个要显示的电影数组,因此我们可以使用 NativeScript 的 ListView 组件。ListView 是一个 NativeScript UI 组件,可以有效地在垂直或水平滚动列表中渲染项目。让我们首先为主页组件创建一个名为 flick 的变量,我们将将其用作 ListView 的数据源。打开 HomeScreen.tsx 并添加以下内容:
// src/components/HomeScreen.tsx

import * as React from 'react'
import { ListView } from 'react-nativescript'
import { RouteProp } from '@react-navigation/core'
import { ItemEventData } from '@nativescript/core'
import { FrameNavigationProp } from 'react-nativescript-navigation'
import { MainStackParamList } from './NavigationParamList'

// Add this 👇
import { FlickService } from '../services/flick.service'

type HomeScreenProps = {
  route: RouteProp<MainStackParamList, 'Home'>
  navigation: FrameNavigationProp<MainStackParamList, 'Home'>
}

export function HomeScreen({ navigation }: HomeScreenProps) {
  // Add this 👇
  const flicks = FlickService.getFlicks()

  return <stackLayout height="100%"></stackLayout>
}
接下来,添加 ListView 组件:
// src/components/HomeScreen.tsx

import * as React from 'react'
import { ListView } from 'react-nativescript'
import { RouteProp } from '@react-navigation/core'
import { ItemEventData } from '@nativescript/core'
import { FrameNavigationProp } from 'react-nativescript-navigation'
import { MainStackParamList } from './NavigationParamList'
import { FlickService } from '../services/flick.service'

// Add this 👇
import { FlickModel } from '../models'

type HomeScreenProps = {
  route: RouteProp<MainStackParamList, 'Home'>
  navigation: FrameNavigationProp<MainStackParamList, 'Home'>
}

export function HomeScreen({ navigation }: HomeScreenProps) {
  const flicks = FlickService.getFlicks()
  // Add this 👇
  const cellFactory = (flick: FlickModel) => {
    return <label text={flick.title} />
  }
  return (
    <stackLayout height="100%">
      // Add this 👇
      <ListView
        items={flicks}
        cellFactory={cellFactory}
        separatorColor="transparent"
        height="100%"
      />
    </stackLayout>
  )
}
NativeScript 中的 ListView 使用 items 属性作为其数据源。在上面的代码片段中,我们将 items 属性设置为 flicks。然后,ListView 遍历 flicks 数组,并使用 cellFactory 中的模板渲染每个条目的内容。如果您现在运行应用程序,您应该会看到一个电影标题列表。
创建电影卡片
在深入研究下面卡片的创建之前,让我们为将在应用程序中使用的背景色和文本色创建一些类。由于这将在整个应用程序中共享,因此让我们将其添加到 app.css 中。打开 app.css 并添加以下内容:
/* src/app.scss */

/* applied when device is in light mode */
.ns-light .bg-primary {
  background-color: #fdfdfd;
}
.ns-light .bg-secondary {
  background-color: #ffffff;
}
.ns-light.text-primary {
  color: #444;
}
.ns-light.text-secondary {
  color: #777;
}

/* applied when device is in dark mode */
.ns-dark .bg-primary {
  background-color: #212121;
}
.ns-dark .bg-secondary {
  background-color: #383838;
}
.ns-dark .text-primary {
  color: #eee;
}
.ns-dark .text-secondary {
  color: #ccc;
}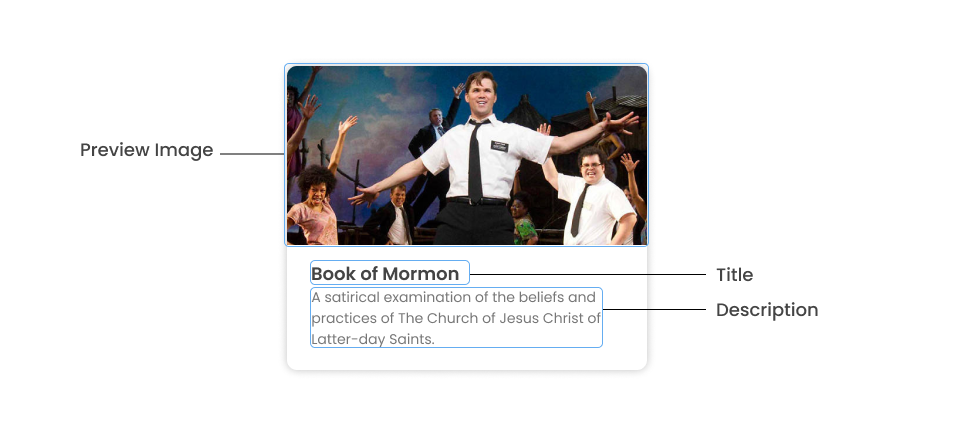
如上图所示,每张卡片由 3 个组件组成:预览图像、标题和描述。我们将使用 GridLayout 作为我们的容器,并使用 Image 和 Label 组件作为预览图像和文本。打开您的 HomeScreen.tsx 并添加以下内容:
// src/components/HomeScreen.tsx
import * as React from 'react'
import { ListView } from 'react-nativescript'
import { RouteProp } from '@react-navigation/core'
import { ItemEventData } from '@nativescript/core'
import { FrameNavigationProp } from 'react-nativescript-navigation'
import { MainStackParamList } from './NavigationParamList'
import { FlickService } from '../services/flick.service'
import { FlickModel } from '../models'
type HomeScreenProps = {
route: RouteProp<MainStackParamList, 'Home'>
navigation: FrameNavigationProp<MainStackParamList, 'Home'>
}
export function HomeScreen({ navigation }: HomeScreenProps) {
const flicks = FlickService.getFlicks()
// Add this 👇
const cellFactory = (flick: FlickModel) => {
return (
<gridLayout
height="280"
borderRadius="10"
className="bg-secondary"
rows="*, auto, auto"
columns="*"
margin="5 10"
padding="0"
>
<image row="0" margin="0" stretch="aspectFill" src={flick.image} />
<label
row="1"
margin="10 10 0 10"
fontWeight="700"
className="text-primary"
fontSize="18"
text={flick.title}
/>
<label
row="2"
margin="0 10 10 10"
className="text-secondary"
fontSize="14"
textWrap="true"
text={flick.description}
/>
</gridLayout>
)
}
return (
<stackLayout height="100%">
<ListView
items={flicks}
cellFactory={cellFactory}
separatorColor="transparent"
height="100%"
/>
</stackLayout>
)
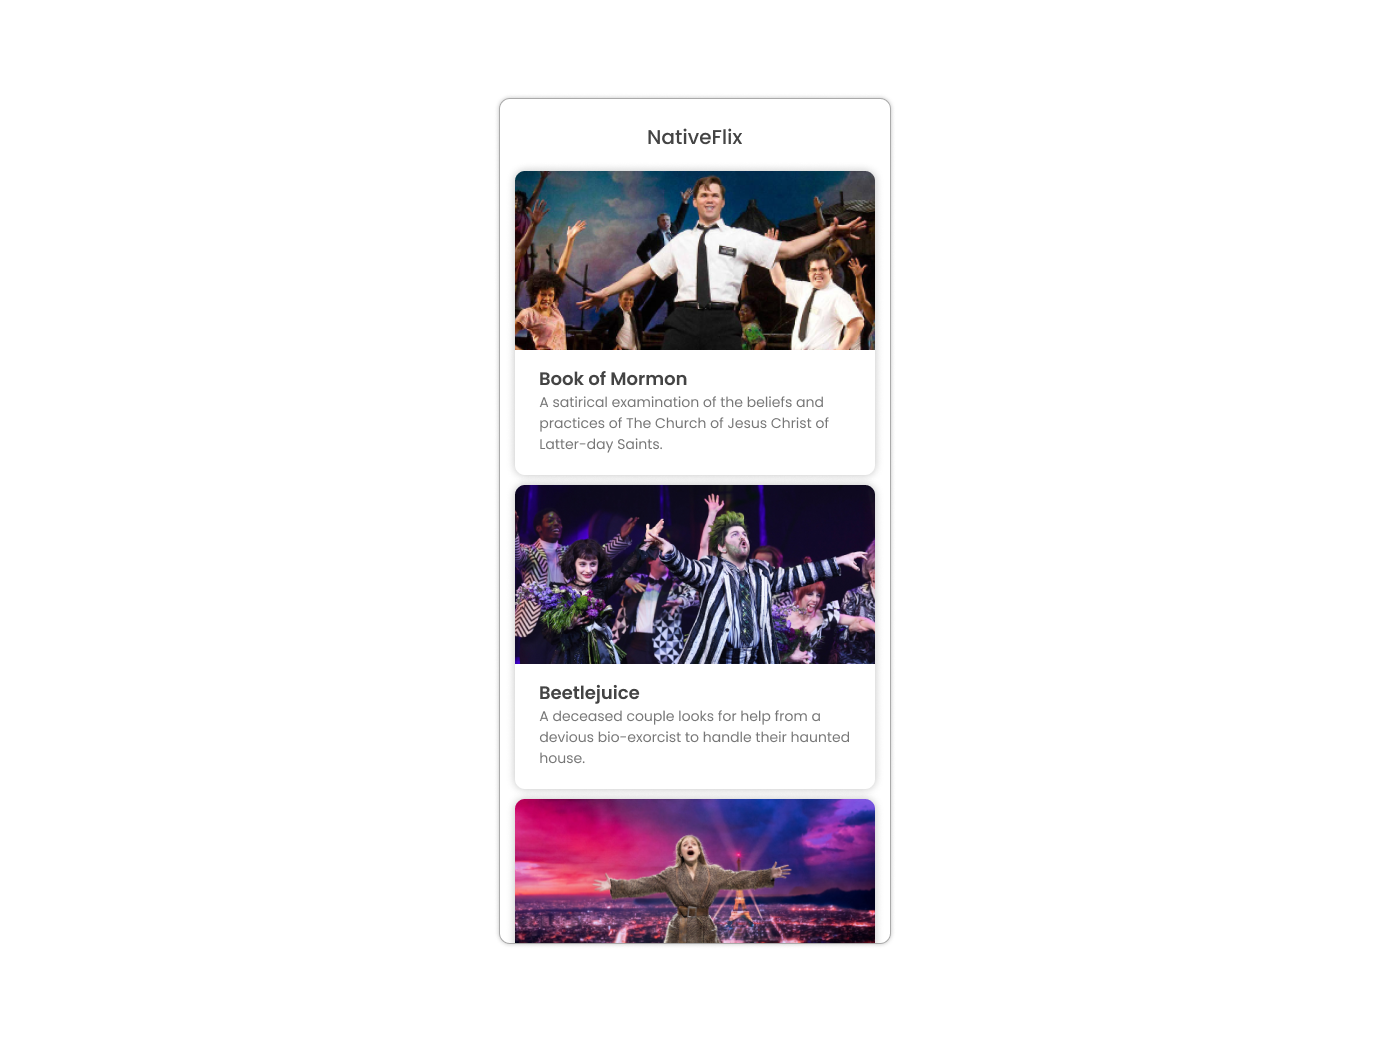
}检查点
如果您已遵循至此,则在任何平台上运行应用程序都应产生与本屏幕截图中类似的应用程序,列表可垂直滚动。
创建详细信息屏幕
让我们从在您的 MainStackParamList 中添加详细信息屏幕的条目开始。打开 NavigationParamList.ts 并添加以下内容:
// src/components/NavigationParamList.ts

export type MainStackParamList = {
  Home: {}
  // Add this 👇
  Details: {
    flickId: number
  }
}
接下来,使用以下内容创建详细信息屏幕文件:
// src/components/DetailsScreen.tsx

import { RouteProp } from '@react-navigation/core'
import { FrameNavigationProp } from 'react-nativescript-navigation'
import { MainStackParamList } from './NavigationParamList'

type DetailsScreenProps = {
  route: RouteProp<MainStackParamList, 'Details'>
  navigation: FrameNavigationProp<MainStackParamList, 'Details'>
}

export function DetailsScreen({ navigation }: DetailsScreenProps) {
  return <stackLayout></stackLayout>
}
设置从主页到详细信息组件的导航
为了能够导航到详细信息屏幕,我们需要在 BaseNavigationContainer 中为 Details 组件添加一个 StackNavigator.Screen 组件。打开 Navigator.tsx 并添加以下内容:
import * as React from 'react'
import { BaseNavigationContainer } from '@react-navigation/core'
import { stackNavigatorFactory } from 'react-nativescript-navigation'
import { MainStackParamList } from './NavigationParamList'
import { HomeScreen } from './HomeScreen'

// Add this 👇
import { DetailsScreen } from './DetailsScreen'

const StackNavigator = stackNavigatorFactory()

export const mainStackNavigator = () => {
  return (
    <BaseNavigationContainer>
      <StackNavigator.Navigator
        initialRouteName="Home"
        screenOptions={{
          headerShown: true
        }}
      >
        <StackNavigator.Screen
          name="Home"
          options={{
            title: 'NativeFlix'
          }}
          component={HomeScreen}
        />
        // Add this 👇
        <StackNavigator.Screen name="Details" component={DetailsScreen} />
      </StackNavigator.Navigator>
    </BaseNavigationContainer>
  )
}
我们将使用 navigation 属性中的 navigate 函数从主页组件导航到详细信息组件。除了路由名称之外,我们还将把电影的 id 传递给 navigate 函数。我们将在详细信息组件中使用此 id 来访问有关电影的更多信息。打开 HomeScreen.tsx 并添加以下内容:
// src/components/HomeScreen.tsx

import * as React from 'react'
import { ListView } from 'react-nativescript'
import { RouteProp } from '@react-navigation/core'

// Add this 👇
import { ItemEventData } from '@nativescript/core'
import { FrameNavigationProp } from 'react-nativescript-navigation'
import { MainStackParamList } from './NavigationParamList'
import { FlickService } from '../services/flick.service'
import { FlickModel } from '../models'

type HomeScreenProps = {
  route: RouteProp<MainStackParamList, 'Home'>
  navigation: FrameNavigationProp<MainStackParamList, 'Home'>
}

export function HomeScreen({ navigation }: HomeScreenProps) {
  const flicks = FlickService.getFlicks()

  const cellFactory = (flick: FlickModel) => {
    return (
      <gridLayout
        height="280"
        borderRadius="10"
        className="bg-secondary"
        rows="*, auto, auto"
        columns="*"
        margin="5 10"
        padding="0"
      >
        <image row="0" margin="0" stretch="aspectFill" src={flick.image} />
        <label
          row="1"
          margin="10 10 0 10"
          fontWeight="700"
          className="text-primary"
          fontSize="18"
          text={flick.title}
        />
        <label
          row="2"
          margin="0 10 10 10"
          className="text-secondary"
          fontSize="14"
          textWrap="true"
          text={flick.description}
        />
      </gridLayout>
    )
  }

  // Add this 👇
  const onItemTap = (args: ItemEventDaa) => {
    const index = args.index
    const flick = flicks[index]
    navigation.navigate('Details', {
      flickId: flick.id
    })
  }

  return (
    <stackLayout height="100%">
      <ListView
        items={flicks}
        cellFactory={cellFactory}
        separatorColor="transparent"
        height="100%"
      />
    </stackLayout>
  )
}
接下来,让我们将点击事件添加到 ListView 项目中。打开 HomeScreen.tsx 并添加以下内容:
// src/components/HomeScreen.tsx

import * as React from 'react'
import { ListView } from 'react-nativescript'
import { RouteProp } from '@react-navigation/core'
import { ItemEventData } from '@nativescript/core'
import { FrameNavigationProp } from 'react-nativescript-navigation'
import { MainStackParamList } from './NavigationParamList'
import { FlickService } from '../services/flick.service'
import { FlickModel } from '../models'

type HomeScreenProps = {
  route: RouteProp<MainStackParamList, 'Home'>
  navigation: FrameNavigationProp<MainStackParamList, 'Home'>
}

export function HomeScreen({ navigation }: HomeScreenProps) {
  const flicks = FlickService.getFlicks()

  const cellFactory = (flick: FlickModel) => {
    return (
      <gridLayout
        height="280"
        borderRadius="10"
        className="bg-secondary"
        rows="*, auto, auto"
        columns="*"
        margin="5 10"
        padding="0"
      >
        <image row="0" margin="0" stretch="aspectFill" src={flick.image} />
        <label
          row="1"
          margin="10 10 0 10"
          fontWeight="700"
          className="text-primary"
          fontSize="18"
          text={flick.title}
        />
        <label
          row="2"
          margin="0 10 10 10"
          className="text-secondary"
          fontSize="14"
          textWrap="true"
          text={flick.description}
        />
      </gridLayout>
    )
  }

  const onItemTap = (args: ItemEventDaa) => {
    const index = args.index
    const flick = flicks[index]
    navigation.navigate('Details', {
      flickId: flick.id
    })
  }

  return (
    <stackLayout height="100%">
      <ListView
        items={flicks}
        cellFactory={cellFactory}
        // Add this 👇
        onItemTap={onItemTap}
        separatorColor="transparent"
        height="100%"
      />
    </stackLayout>
  )
}
访问导航属性
我们在上一节中将用户点击的电影卡片的 id 作为导航到详细信息页面时传递。我们可以通过 route.params 属性访问传递的 id。然后,我们可以使用 id 获取选定的电影信息,以便在详细信息组件的模板中显示。打开 DetailsScreen.tsx 并添加以下内容:
// src/components/DetailsScreen.tsx

import * as React from 'react'
import { RouteProp } from '@react-navigation/core'
import { FrameNavigationProp } from 'react-nativescript-navigation'
import { MainStackParamList } from './NavigationParamList'

// Add this 👇
import { FlickService } from '../services'

type DetailsScreenProps = {
  route: RouteProp<MainStackParamList, 'Details'>
  navigation: FrameNavigationProp<MainStackParamList, 'Details'>
}

// Update the input of this function 👇
export function DetailsScreen({ route }: DetailsScreenProps) {
  // Add this 👇
  const flickId = route.params.flickId
  const flick = FlickService.getFlickById(flickId)

  return <stackLayout></stackLayout>
}
详细信息 UI
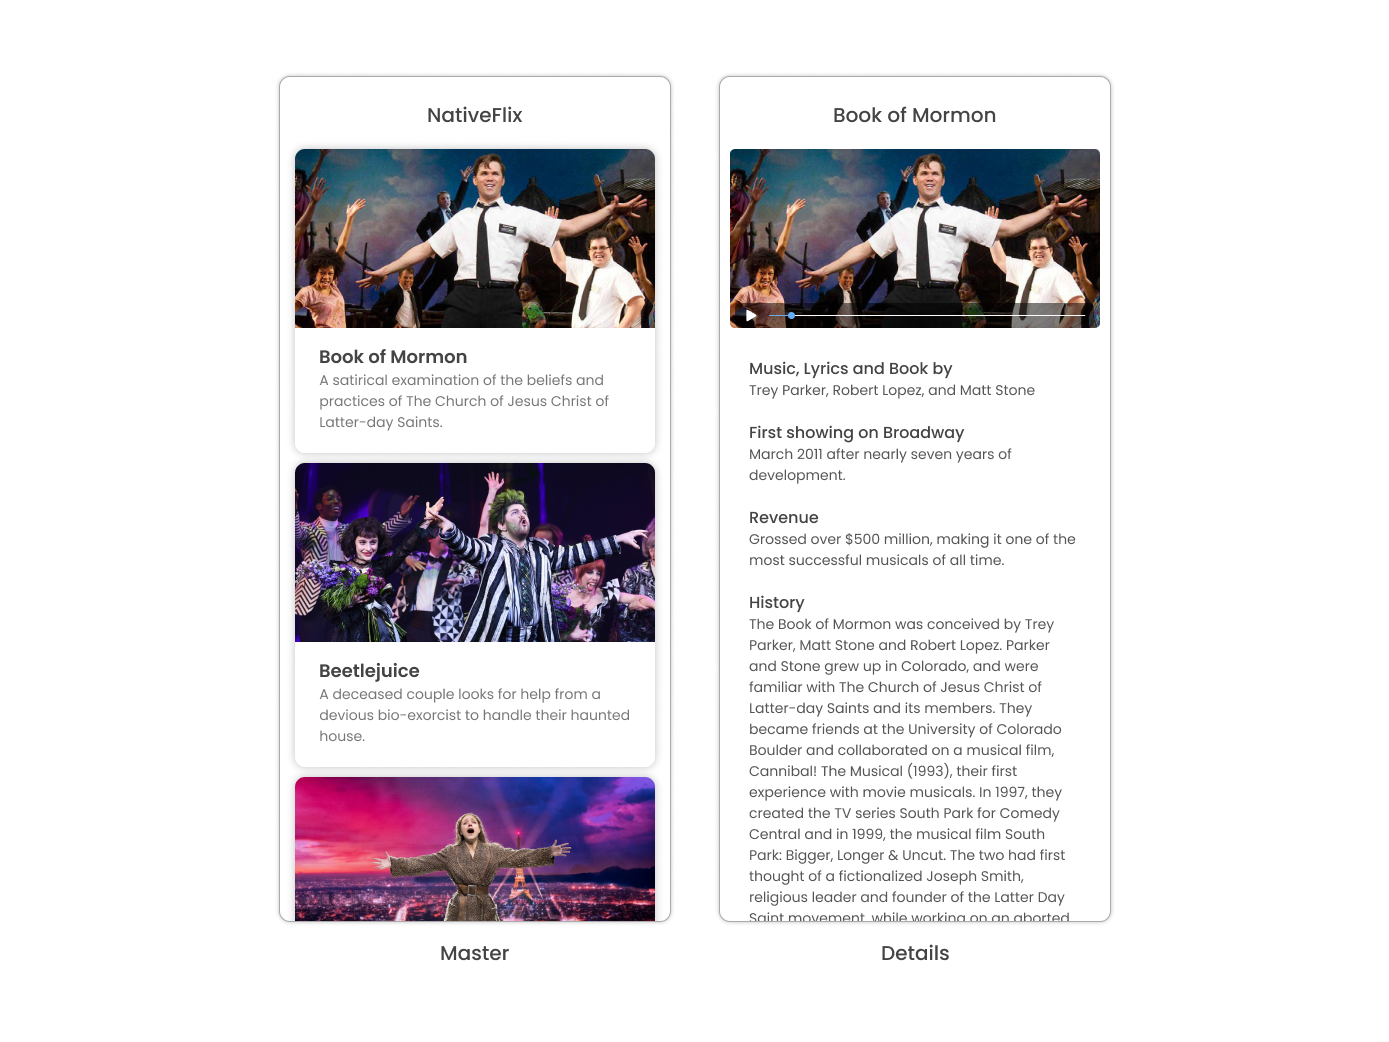
让我们分解详细信息页面的布局和 UI 元素。
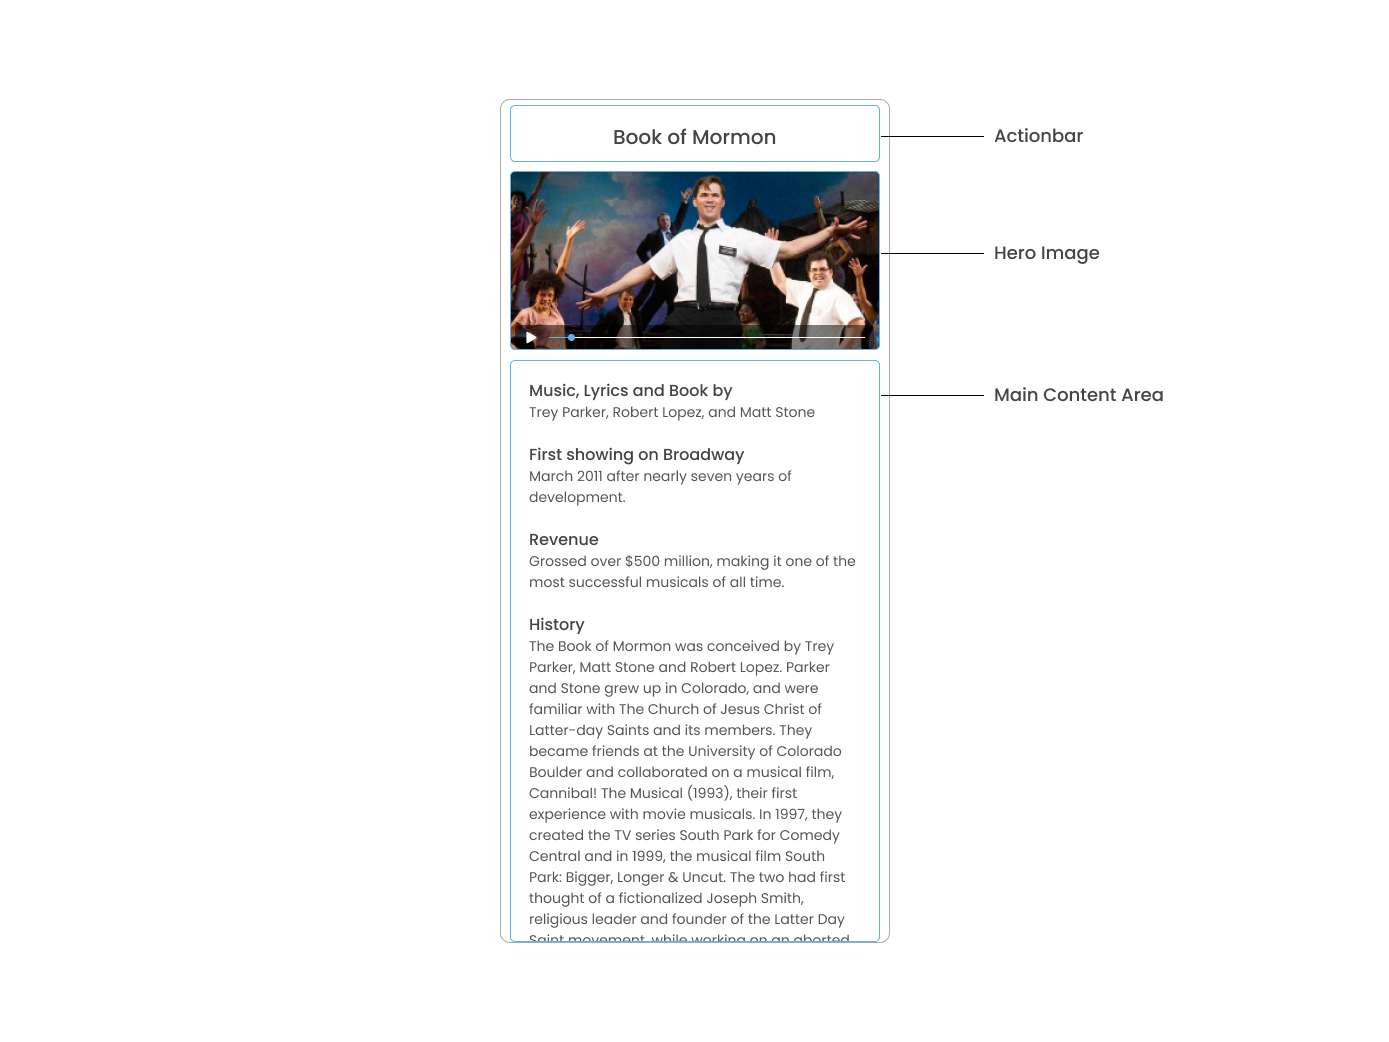
详细信息页面可以分为三个主要部分:带有电影标题的 ActionBar、英雄图像以及带有电影详细信息的主要内容。我们将使用 flicks 对象中的 details 数组来填充电影详细信息部分。details 数组包含具有 title 和 body 的对象,这些对象以统一的方式呈现,每个对象都有其样式。我们可以使用 Javascript 的数组 map 运算符遍历 details 数组,并为数组中的每个条目创建一个 UI 元素或一组元素。打开 DetailsScreen.tsx 并添加以下代码:
// src/components/DetailsScreen.tsx

import * as React from 'react'
import { RouteProp } from '@react-navigation/core'
import { FrameNavigationProp } from 'react-nativescript-navigation'
import { MainStackParamList } from './NavigationParamList'
import { FlickService } from '../services'

type DetailsScreenProps = {
  route: RouteProp<MainStackParamList, 'Details'>
  navigation: FrameNavigationProp<MainStackParamList, 'Details'>
}

export function DetailsScreen({ route }: DetailsScreenProps) {
  const flickId = route.params.flickId
  const flick = FlickService.getFlickById(flickId)

  return (
    // Add this 👇
    <scrollView height="100%">
      <stackLayout>
        <image margin="0" stretch="aspectFill" src={flick?.image} />
        <stackLayout padding="10 20">
          {flick.details.map((flickDetails, index) => (
            <stackLayout key={index}>
              <label
                marginTop="15"
                fontSize="16"
                fontWeight="700"
                class="text-primary"
                textWrap="true"
                text={flickDetails.title}
              />
              <label
                fontSize="14"
                class="text-secondary"
                textWrap="true"
                text={flickDetails.body}
              />
            </stackLayout>
          ))}
        </stackLayout>
      </stackLayout>
    </scrollView>
  )
}接下来,将ActionBar的标题设置为所选电影的标题。我们将使用details' StackNavigator.Screen组件的options对象的title属性。打开Navigator.tsx并添加以下内容
// src/Navigator.tsx
import * as React from 'react'
import { BaseNavigationContainer } from '@react-navigation/core'
import { stackNavigatorFactory } from 'react-nativescript-navigation'
import { MainStackParamList } from './NavigationParamList'
import { HomeScreen } from './HomeScreen'
import { DetailsScreen } from './DetailsScreen'
// Add this 👇
import { FlickService } from '../services'
const StackNavigator = stackNavigatorFactory()
export const mainStackNavigator = () => {
// Add this 👇
const flickTitle = flickId => FlickService.getFlickById(flickId).title
return (
<BaseNavigationContainer>
<StackNavigator.Navigator
initialRouteName="Home"
screenOptions={{
headerShown: true
}}
>
<StackNavigator.Screen
name="Home"
options={{
title: 'NativeFlix'
}}
component={HomeScreen}
/>
<StackNavigator.Screen
name="Details"
// Add this 👇
options={({ route }) => ({
title: flickTitle((route.params as MainStackParamList['Details']).flickId)
})}
component={DetailsScreen}
/>
</StackNavigator.Navigator>
</BaseNavigationContainer>
)
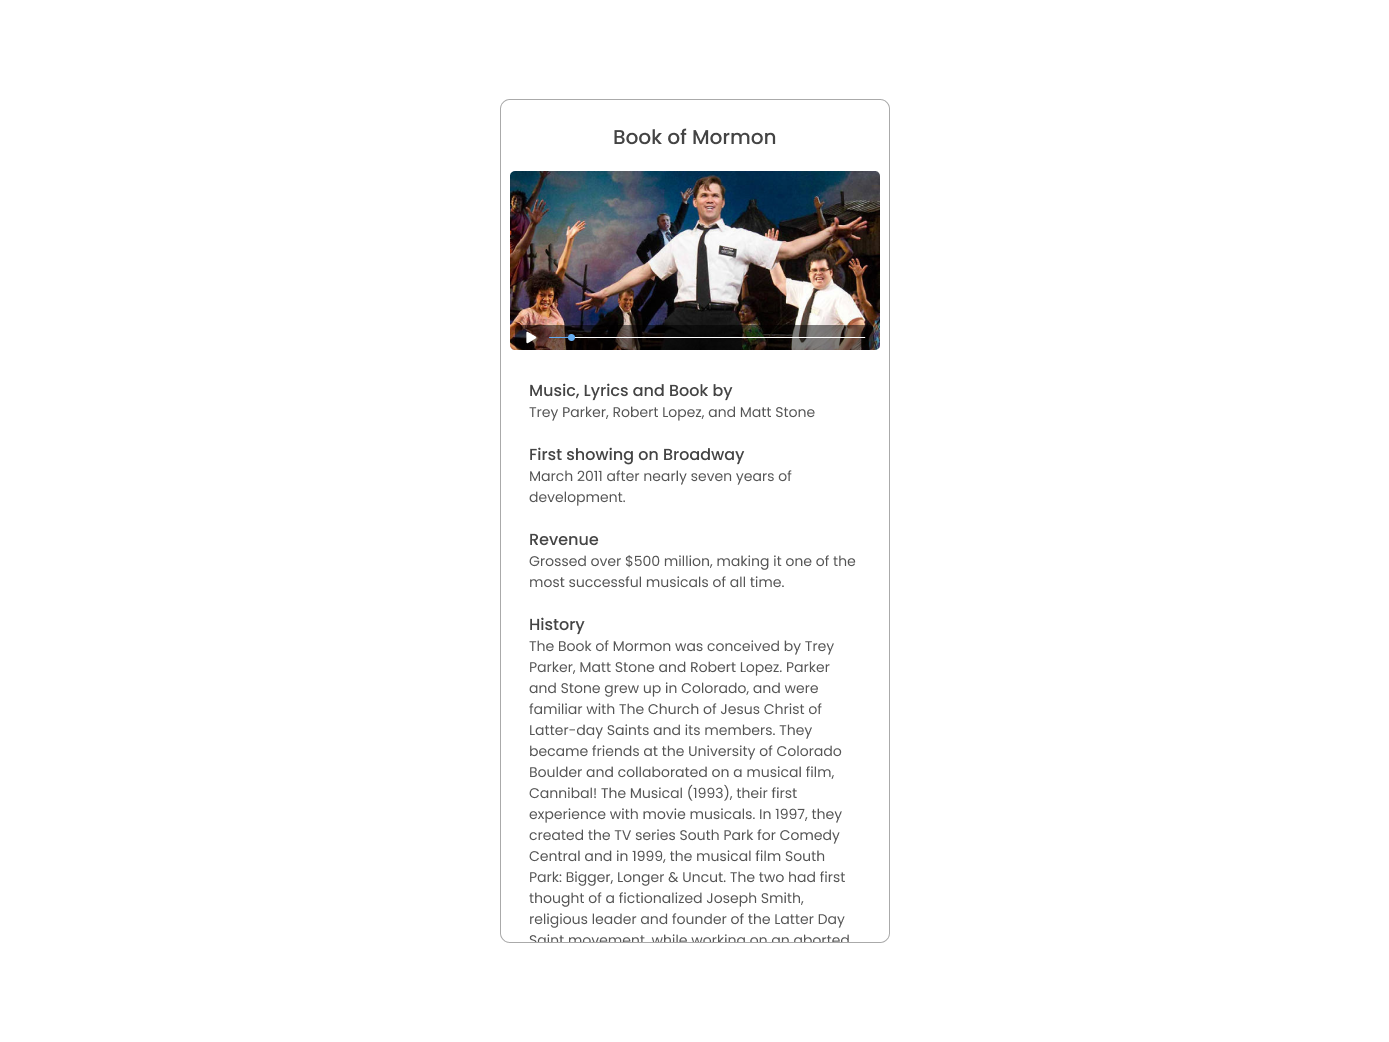
}检查点
现在在任何一个平台上运行应用程序,都应该得到一个类似于此截图中的应用程序,并且能够在主页和详情页之间导航。
下一步
恭喜!您构建了第一个在 iOS 和 Android 上运行的 NativeScript 应用程序。您可以继续添加更多NativeScript UI 组件(或构建您自己的自定义 UI 组件),或者您可以添加一些原生功能。可能性是无限的!